|
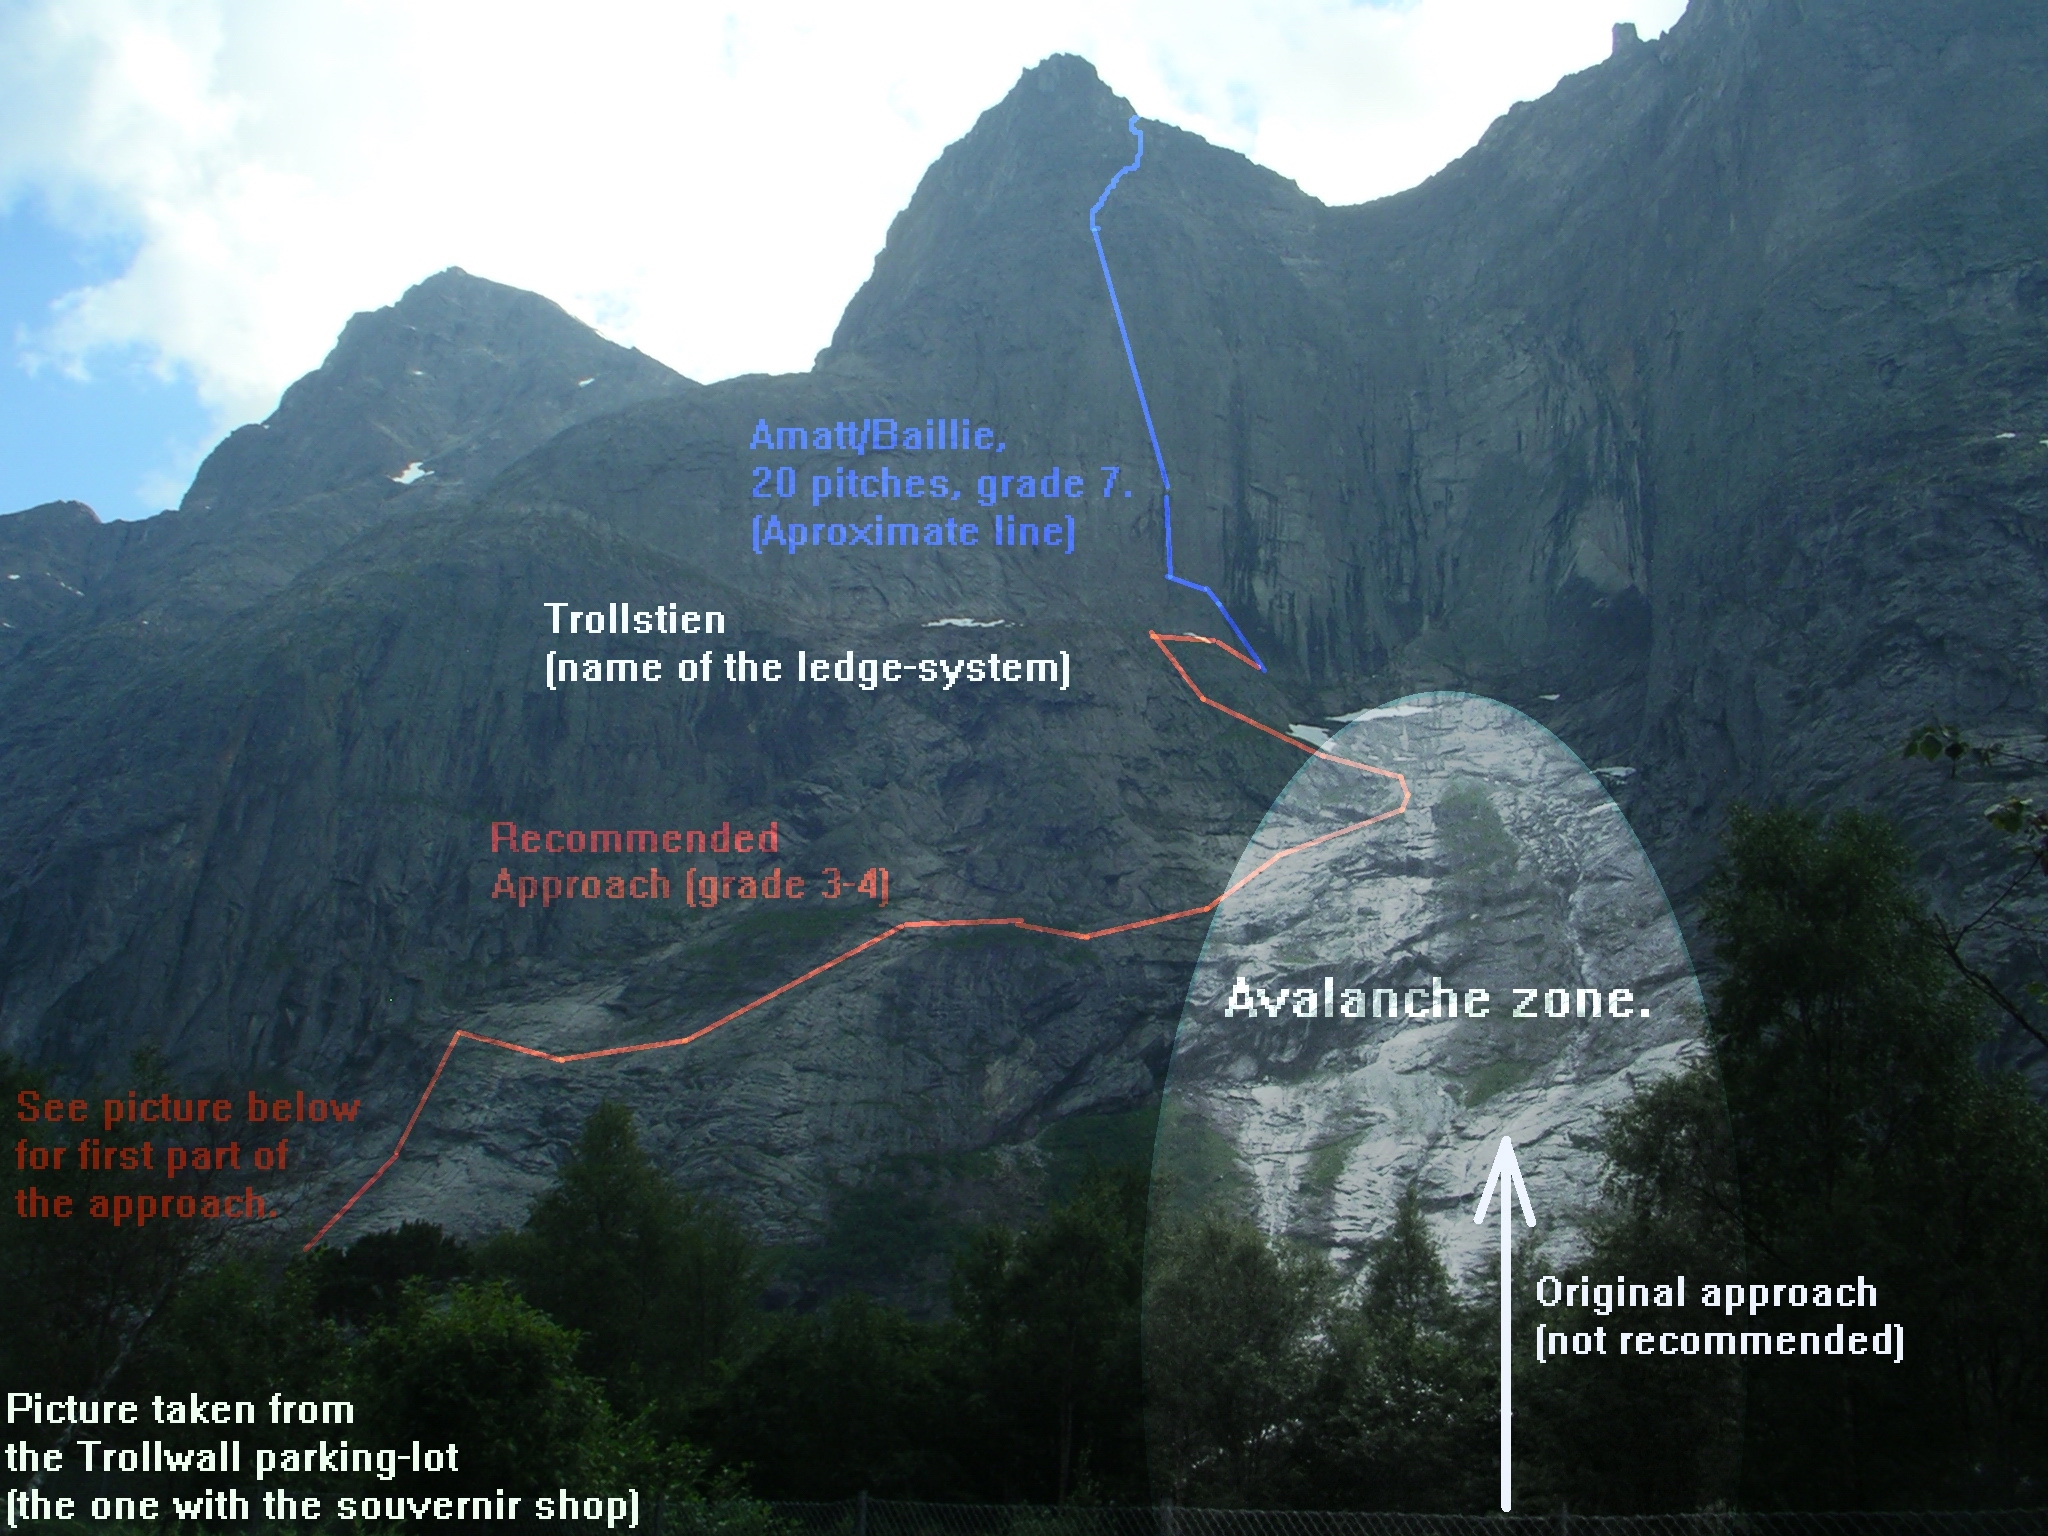
Amatt/Baillie, grade 7, 20 pitches FA: John Amatt, Rusty Baillie (1967). Free: Sindre Sæther, Ole Johan Sæther (2007). Amatt-Baillie is located on the north-wall of Semletind (also called Søndre Trolltind) just left of the famous troll-wall in Romsdalen. In 1967 this route was at the frontier of aid-climbing. John Amatts report from the first-ascent is great reading. Even though the route was given the hard aid-grade A4, this may not reflect the challanges met nearly a half century later. In fact both sections originally rated A4 can be free-climbed at grade 6 (last part of pitch 4, and first part of pitch 5). We think this route has potential to become one of the absolute (free-climbing) classics of Norway. The main wall is exposed, the rock is solid and clean, and ledges are very sparse. The sustained character of the climbing, and the wet crux-pitches (pitch 4 and 5) makes the route a nice little test-piece for the grade. |
Click here for picture of the first part of the approach!
| Topo by text: | |
| Time | 1-2 days |
| Rack | Bring your standard assortement of nuts. Cams: good assortement from black alien to #4 camalot (weight from blue to red alien (red alien = #0.5 camalot)). Optional: #5 friend (see pitch 13). Be prepared for som long sustained pitches at grade 6-7. |
| Approach | The original approach (see picture above) goes in an area sweapt frequently by avalanches. The approach described here is the one we recommend and is very pleasant (the lower part is a beutifull little hike/climb in itself!). Only for a little while does the recommended approach cross into the area indicated on the picture as "avalanche zone". It is smart to get through this section before the morningsun arrives (unless you dont like large amounts of rushing snow and stone). Cross the river by the railroad bridge close to Hornaksla. Take the path into the wood just after the bridge. Follow this for a while. You can walk to the hut then struggle through the bushes till you reach the talus underneath the slabs (see picture). But it is faster to take left a few houndred meters prior to the hut. Walk up to the very highest point of the talus, and climb a short layback crack some meters out on your left. Then walk some houndred meters up the slabs (beutifull rock!). Then you reach a steeper part with cracks and dihedrals (grade 3-4). Climb this to the top, and traverse right as indicated on the picture. Follow the path on the picture all the way up to trollstien (you may wish to use a rope the last 50 meters up to trollstien (grade 5)). You follow trollstigen down to the left-hand side of the enormous wet, black streak. |
| Pitch 1-3: |
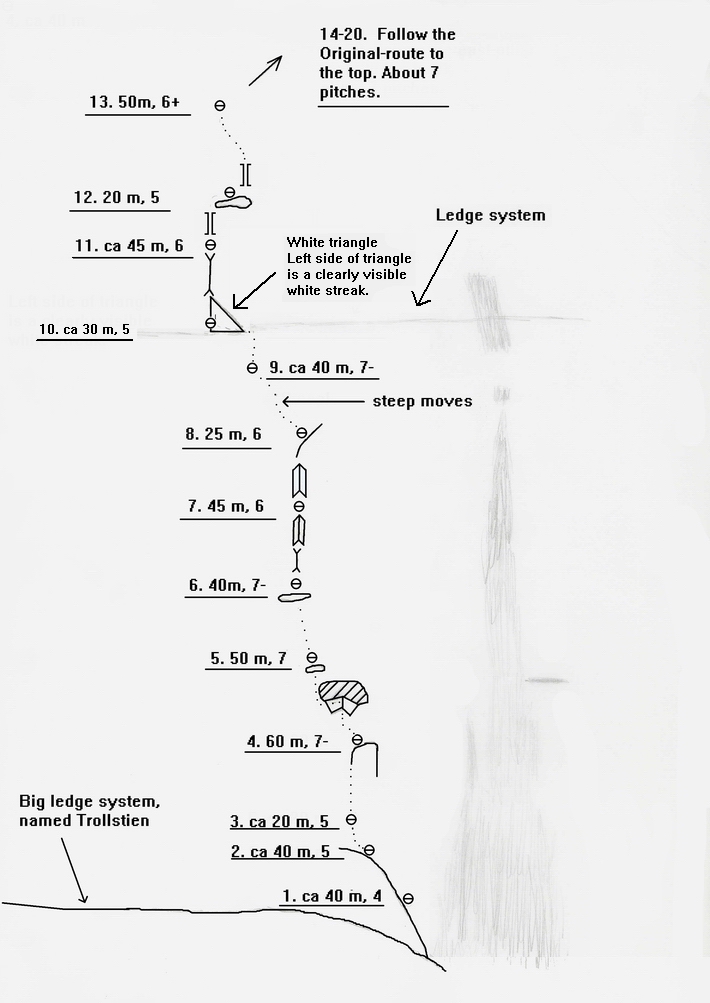
From the left-hand side of the enormous wet, black streak you follow the easy ground up and left (grade 4-5). The third pitch takes you up from the ledges to the point where the hard climbing begins (yes, you want to make a belay here so that you can reach the top of the flake in a 60 m. pitch). The line is obious, you are aiming for the left hand side of the big flake in the top of pitch 4. |
| Pitch 4: |
This is a long, sustained and wet pitch! Fantastic! Perhaps only 6+ in dry condition, but it seems like it will always be wet. The start of the flake is a wet off-with/chimney. Climb some meters inside this one before you climb out on the flake (or just follow the chimney to the top if you really enjoy it;-) |
| Pitch 5: |
The aid-route traverse straight out left from the flake, and then heads straight up toward the roof. The free variations goes up and slightly left from the belay-flake. You follow small formations/flakes (6-, tricky to find good protection in the start) heading for the dihedral underneath the big roof. You traverse left underneath the roof (7), and find a tiny ledge for belay some meters above. |
| Pitch 6 |
40 m sustained climbing up and slightly left. The line is obvious. After 40 m you reach a nice ledge (50cm wide, several-meters long, the best one until you reach the ledge-system in pitch 10). |
| Pitch 7 | Just follow the big formations, there is only one line. After the wide crack you climbe the easy dihedral to a belay. |
| Pitch 8 | You continue up the dihedral, and take belay where the formation (huge flake) becomes a right slanting slab. |
| Pitch 9 | From here you climb left and up. Some steep moves followed by some slopers (7-). After some more climbing left and up, you may wish to make a belay. From here you can clearly see the large ledge system, splitting the wall horizontally, 10-15 meters above your head. |
| Pitch 10 | Climb 10-15 m of easy terrain up to the ledge system and traverse left underneath the white triangle. You may need to look twice before you recognize the triangle, but the left side is a clearly visible white streak. The white triangle is the spot of the preveous "fingers of fate"-flake, which is gone now, but where the 1967-team climbed. It is recommened to take belay underneath and left of a extremely loose 0.5x1 m. block, so that the rope does not touch it in the next pitch (the block may be gone). |
| Pitch 11 | This is a lovely pitch up wide cracks! Take hanging belay underneath the chimney. |
| Pitch 12 | Climb up the chimney (5) to the big ledge. If you are lucky it might (barely) be possible to combine pitch 11 and 12 with your 60 m rope (with a 70 m you will be find). |
| Pitch 13 | Climb the overhanging chimney (6+). You probably wish you had a big cam (friend #5) on the crux, but this is the only place on the route where you will make use of it. |
| Pitch 14-20 | Follow the Original /east pillar-route to the top. Grade 3-4. Follow the easiest way up the ledges to the top. The first pitches traverses a bit right. The first part is loose, the last part is very loose. Make sure you never belay straight underneath the lead-climber. |
| Descent | From the summit, head down the northwestern slopes and pick up the trail leading down to the Trollstigen road (5 km). |
Some pictures from the route.